User guide
This is a generalized User Guide that will walk you though some basic functions in clevr. Please note that your implementation may differ from the processes shown below or that you may not have access to all the modules shown. This is meant to be a generalized guide for getting started with clevr.
Logging In
You can log into clevr using the following link:
A username and password should be provided to you by your district. If you do not have a username and a password, please contact clevr Support.

Forgot your password? Click the forgot password link highlighted above, enter your username, and
an email will be sent to you with a link to select a new password. For more information about resetting your password please see our Forgot Password document.
| Tip: Popups must be enabled in your browser to use all features of clevr (Ex: print preview). |
Choosing Your School and Form
When you login to clevr, you will land on the Homescreen. Each user is assigned a default location and form which will be the default options your Homescreen lands on. Users who have access to more than one school can change the location dropdown beside their name found at the top right hand corner above the navigation menu.
To change forms, click on the form dropdown found under the form name to the left side of the page.
Note: As the form in this dropdown is changed, the list of students on the homescreen will change.

| Tip: The homescreen is a common view between all clevr users with access to that student and location. Removing a student from the Homescreen will remove them from the Homescreen of all users. |
Saving within clevr
Data entered into clevr saves automatically to the cloud meaning that you do not have to save manually. Saving is indicated by the perimeter of the element / field you have modified turning green. An element that does not change colour or turns red indicates that saving did not work. This might occur if the wireless internet connection is temporarily lost!
More information about saving can be found in our Saving article here.

Adding Students
Adding a Single Student
To add a student to the Homescreen list (Ex: create an IEP for a student), click on the “Add” button on the Homescreen.

In the Add screen you will have four options for searching students: Last Name, Student Number, Grade and First Name. The most commonly used search option is Last Name.
Type in the first few letters of the student’s last name within the text box provided and click Search (ex: for the last name Smith you can type “Smi”). You will be presented with a list of results. Once you locate the desired student, click on the student’s name to add them to the form.

Adding Multiple Students
If you need to add more than one student at a time, follow the same steps as indicated above, except this time you will check the checkbox to the left of each student listed that you would like to add.
After you have selected your desired students, click the Add button. You will receive a prompt asking whether you want to update the selected students via Bulk Data Entry. Click the Cancel button (this cancels bulk data entry, not adding students) and the selected students will appear on the Homescreen. From here you can individually click each student and start adding data to the record.

Change Locations
If you have access to more than one location within clevr, you will see each location that is assigned to you in the dropdown at the top right side of the page. You can also select “All Locations” if you are assigned to multiple schools.

Import Data
Within a form, selecting Import Data will populate fields that have been flagged to receive data from your SIS. To access the Import Data button hover over the Integration button in the top right menu bar and click Import Data.


| Tip: If you are a user with more than one location, your location dropdown must match the location the student is located at or the Import Data will fail. |
Records
Many students have a form that will require updating over a prolonged period of time (for example Individual Education Plans, Individual Program Plans, Inclusion and Intervention Plans, etc). Within clevr, data from previous years can be archived and preserved with record management.
Before you take any action to manage records you need to check in with your district about the exact process first. Many Districts and Divisions archive records automatically in the summer, so if you take action you can cause duplicates which can negatively impact other areas of clevr. If you are unsure please reach out to clevr support first by clicking here.
When a student is added to a form for the first time a record is also started for that form. If extra records are required, there are two buttons you can use.
Select new record from the Records menu to make a totally blank record for that student. If you would prefer a copy of the existing record select clone record from the Records menu to make a copy of the current record.

To view the records a student has for the selected form, navigate to Records > Record History. Click on the pencil icon to open the selected record.

Adding Another Form from Within a Student’s Record
You are able to add a student to another form while within one of their records without having to navigate back to the Homescreen. While you are in the student’s record, select the dropdown menu below the top right menu bar shown below. This dropdown menu contains a list of all forms that you have access to. Select the form you would like to start a new record for within this dropdown (ex: ELL) and click the add button. This will automatically create a new record for you and take you to it.

Form Quick Cycle
Form Quick Cycle allows you to quickly navigate from one form to another to another for the current student instead of navigating back to the Homescreen. In the top right menu bar, hover over Forms. This will show you all the forms the current student has assigned to them. To navigate to another form select your desired choice from the list.

| Tip: Forms are sometimes called Initiatives or Templates, though “Form” is the main designation. |
Undo Button (NOT a Save Button)
The Undo button is a feature that allows you to undo the last three items that you entered into clevr. These items can be the contents within a textbox, a dropdown selection, or a date. You can find the Undo button next to the spell check button on the top right corner of any form.

Spell Check
Use the Spell Check tool to check the spelling of data you have entered within clevr. This tool is located in the top right corner of any form. If a spelling mistake is found you will have the option to change, ignore, or replace the word in a pop up box.
Note: You must have pop ups enabled in your browser to use Spell Check. To learn how to enable popups, please view our help document here.

Print Button
To print a form select the Print option from the top right menu bar while you’re in a student’s record. When you click Print, a new tab will be generated within your browser with the Printout in .pdf format. If this new tab does not generate and there is no .pdf, you need to enable popups in your internet browser. Popups MUST be enabled in your web browser to print a record within clevr - see our article here for more information. This will print a single form for a single student.

Print - Multiple Reports for a Single Student
In clevr you are able to print out multiple reports for a single student without having to go into each form individually. While you’re in the student’s record select the Multiple Reports button in the Print menu. This will open a pop-up window with the available forms for that student. Select the forms in the list with the checkboxes and click the Print button.

| Tip: If a student does NOT have “Multiple Reports” as an option in the print menu, it means that the student has only has one form. |
Bulk Print - Printing a Single Form for a Group of Students
To Bulk Print a single form for a group of students, navigate to Bulk Printing in the Bulk option from the top right hand navigation menu.

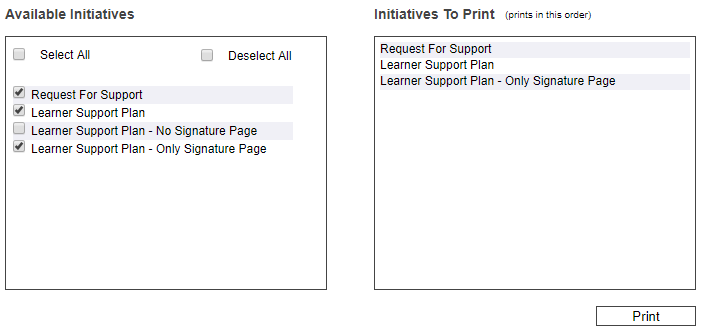
Users who have access to multiple locations should set the location dropdown in the top right hand corner to the location they wish to print records for. In the Bulk Print menu screen, select the form you would like to print in the left hand column. In the middle column, you can select different parameters to narrow down your results. As you select different parameters, the list of students in the right column will narrow down. You can select which specific printout you would like from the Report Options dropdown found above the Bulk Print table (For example, the LSP has many printouts such as Learner Support Plan, LSP - no signature, LSP - Only Signature, etc). Check the checkboxes next to the student’s names that you would like to print in the right hand column, the press Print.

More information about Bulk Printing can be read here.
| Tip: Different forms will have different “Filter by Category” options available. |
Accessing Students Who Have Left the Division and Pre-Registered Students
Students are never deleted or removed from clevr. If you are looking for the record of a student who has left the division, you can find them under the Inactive dropdown menu. You can interact with the form of an inactive student the same way as you would an active student.
In the summer, students who are pre-registered for the fall (such as K students or students heading into highschool) can be found by changing the same drop down menu to Pre-Registered.

You can read more about Student Status here.
Search - Homescreen
Users looking for a specific set of students on the home screen are able to apply different search filters to narrow down the list of students.
First, select the appropriate form in the form dropdown. Beside the form dropdown is a dropdown where you can select your desired search parameters. There is only one of these fields by default, but you can press the Add button shown below to add up to three total search fields. After you have entered your search parameters, press Search.

| Tip: Fields such as grade, school year, school, etc are tied to corresponding fields in the form, NOT the student ribbon (found above the form with the student’s data in it such as Date of Birth and ASN Number). If the field on the form is blank, it will not return search results. |
Adding Files and Links
Please follow these steps to upload a file into the Files and Links tab:
Click the Choose File button to locate the file on your computer
Click on the file name and then click Open
Enter a File Alias name - this can be whatever you like to help you identify the file
Click Upload File button
Please follow these steps to add a link into the Files and Links tab:
Enter an Alias name - this can be whatever you like to help you identify the link
Paste the Link or URL into the Enter Link field
Click the Upload Link button

| Tip: Files can be no larger than 10MB in size. |
Homescreen Alerts
A blue circular icon will appear next to the name of each student who has had their data modified since your last login on the Homescreen. This icon also appears in real time whenever a record has been updated. Hovering over this icon will tell you the name of the user who last updated the record along with the date and time the record was updated.

Help? Support? Questions?
If you have any questions or require further assistance please feel free to contact us here or call us at 613-779-8005 or 613-966-6806.
Helpful Tips
The maximum number of characters that can be entered into a text field is a 4000
The system will timeout after 30 mins of inactivity
The maximum file size that can be added to Files and Links is 10 MB
Printing, along with several other features in clevr, requires pop ups to be enabled in your web browser
clevr should NEVER be open in more than one tab on your browser