Dashboard
The Dashboard is a landing page in clevr composed of different widgets.
Enabling the Interactive Dashboard
There is a two-step process involved in enabling the Interactive Dashboard. First, you must ask the clevr team to enable it for your desired role(s).
After the clevr team has enabled the Interactive Dashboard, users who have access to the User Module can set this as a user’s login page by changing the default page to 950. Users who do not have access to the User Module can have the clevr team take care of this step. This can be done on an individual user basis or by role.

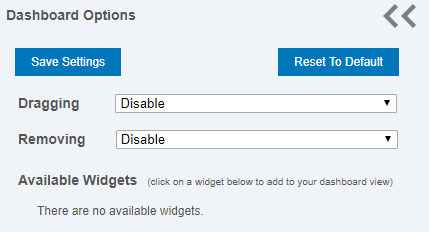
Interactive Dashboard Settings
The Interactive Dashboard is composed of widgets that you are able to drag and remove. By default these options are turned off. To turn them on, click on the gear icon to the top left side of the page. This will cause the Dashboard Options menu to slide out. To enable dragging and removing, change the dropdown beside your desired option from “Disable” to “Enable”. By default, these settings are set to “Disable”. Selecting “Save Settings” will store these settings for the next time you log in. “Reset to Default” will clear any changes you have made (removing, dragging) and restore the dashboard to “Factory” settings.

Recovering a Removed Widget
All widgets that have been removed are available to be re-enabled via the Dashboard Options menu. Simply open the menu, and navigate to “Available Widgets”. Click on any widget in this list to make it appear on the right hand side of the Dashboard. You can then enable Dragging to move it where you desire.

Switch Form & Scroll to Forms
At the top of the Interactive Dashboard, you will find the Switch Form dropdown. Changing this will change the Metrics Widget, Search Widget, and the What’s New Widget. Beside this dropdown is Scroll to Forms button. Pressing this will scroll down the page to the Form Tiles.

Metrics Widget
Different fields can be flagged to appear in the Metrics Widget. Clicking on any of the metrics will take you to the Homescreen and run a search for that item. For example, clicking # of Completed Records will run a search for “Required Fields Completed” on the Homescreen. The Metrics Widget can be removed and resized when the proper settings are enabled in Dashboard Options.


Logo Widget
The logo widget will display the logo that has been uploaded to the Tenant Logos Module. The Logo Widget can be removed and resized when the proper settings are enabled in Dashboard Options.
Search Widget
The Search Widget will run a search on the Homescreen with the parameter(s) you select. The Search Widget can be removed and resized when the proper settings are enabled in Dashboard Options.
Saved Searches Widget
Searches that you have saved via the Advanced Search module will appear in this widget. Clicking on the name of the search will run the search.

Messages Widget
A user can deploy a message to the Messages Widget via the Alerts Module. The Messages Widget is mandatory and can not be removed even when the remove setting is enabled in Dashboard Options. Users who do not have access to the Alerts Module can request access from the clevr team.

To deploy a message to the dashboard via the Alerts Module, you will need to set the Page Location to “Dashboard”. Message Type, Sticky, Stay Time, Begin Date, and End Date with auto-populate and can not be modified when deploying a message to the Dashboard. HTML can be used in a Dashboard Message such as <a href=”...”></a> to enter a link.

What’s New Widget
The What’s New widget will show you the name of the last 10 student records that were modified for the form selected in the Forms dropdown along with the date that the records were modified. Clicking on the arrows beside “Last Update” or “Name” will sort the list numerically or alphabetically. Clicking on the name of a student will take you to that student’s record. The What’s New widget can be removed when the proper settings are enabled in Dashboard Options.

Forms Widget
The Forms Widget is not a true widget. You are not able to remove, or drag this widget.
The Forms Widget shows all forms a user has access to in alphabetical order. If a user has a has a record associated with a form and they click on that Form Tile, it will take them right to their record. For example, if a teacher has a Classroom Observation Request, clicking that tile takes them directly to their record. If a user does not have a record for the associated form, clicking on a Form Tile will take the user directly to the Homescreen for that form.
