Record Rollover Preparation Guide
Table of Contents
What is a Record Rollover?
Record Rollover Administration Checklist and Tasks
STEP 1: FLAGGING FORMS FOR ROLLOVER AND SELECTING ROLLOVER TYPE
STEP 2: UPDATE/FLAG FORMS THAT ARE TO BE ROLLED OVER
STEP 3: DETERMINING WHICH FIELDS SHOULD NOT CLONE IF A CLONING ROLLOVER IS SELECTED
STEP 4: UPDATING REPORT FIELDS (DONOTCLONES) IN THE CLEVR EDITOR
As the end of school year is quickly approaching, now is the time to plan for your clevr Record Rollovers! It is recommended that you perform the clevr Record Rollover in advance of your SIS Record Rollover in order to archive/preserve records with the data that existed at the end of the current school year and prepare the records for the next school year.
What is a Record Rollover?
Record Rollover is an end of year process that prepares the records stored in clevr for the start of a new school year. This includes archiving current records, and creating new records for the upcoming year with the appropriate school year. This process is typically performed once a year, usually during the summer months, after the current school year’s records are complete.
Record Rollover Administration Checklist and Tasks

STEP 1: FLAGGING FORMS FOR ROLLOVER AND SELECTING ROLLOVER TYPE
To begin the Rollover, you will want to make sure you have identified the forms that need to be archived and the method/rollover type for archival. The Rollover Type will be dependent on the type of form that is being rolled over.
In clevr, there are three Rollover Types to choose from. Below we have identified the rollover types, examples of forms that are normally included, and whether preparation is required on the form itself.
|
Rollover Type |
Option to Select in Form Management Module |
Action & Common Forms |
Other Actions Needed |
|
Bulk Lock |
Include in Rollover |
This action bulk locks the current years’ records and DOES NOT prepare records for next year. Ideal for forms that capture a specific or one-time event:
|
No |
|
New Record |
Create New Record in Record Rollover |
This action bulk locks the current years’ records and makes a BLANK new record for the upcoming school year. Common forms for this type of rollover:
|
No |
|
Cloned Record |
Copy Existing Data to the New Record in Record Rollover |
This action bulk locks the current years’ records and makes a clone for the upcoming school year. Common forms:
|
Yes - Identify Fields that should be tagged as DoNotClone (see Step 4 heading below) |

STEP 2: UPDATE/FLAG FORMS THAT ARE TO BE ROLLED OVER
The easiest way to locate a list of your forms that are available in clevr is through the Form Management Module.
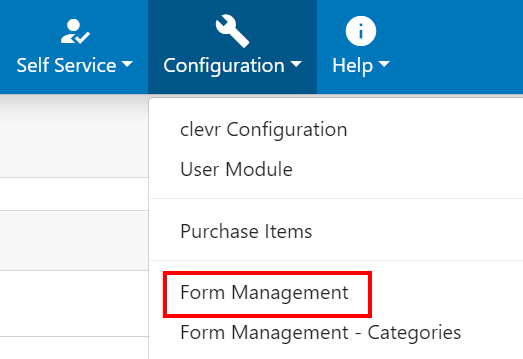
From the clevr Navigation Menu select the Configuration Menu > Form Management Module to identify the forms that have been flagged for Rollover.
The Form Management module will include all of the forms that are available on your clevr tenant.
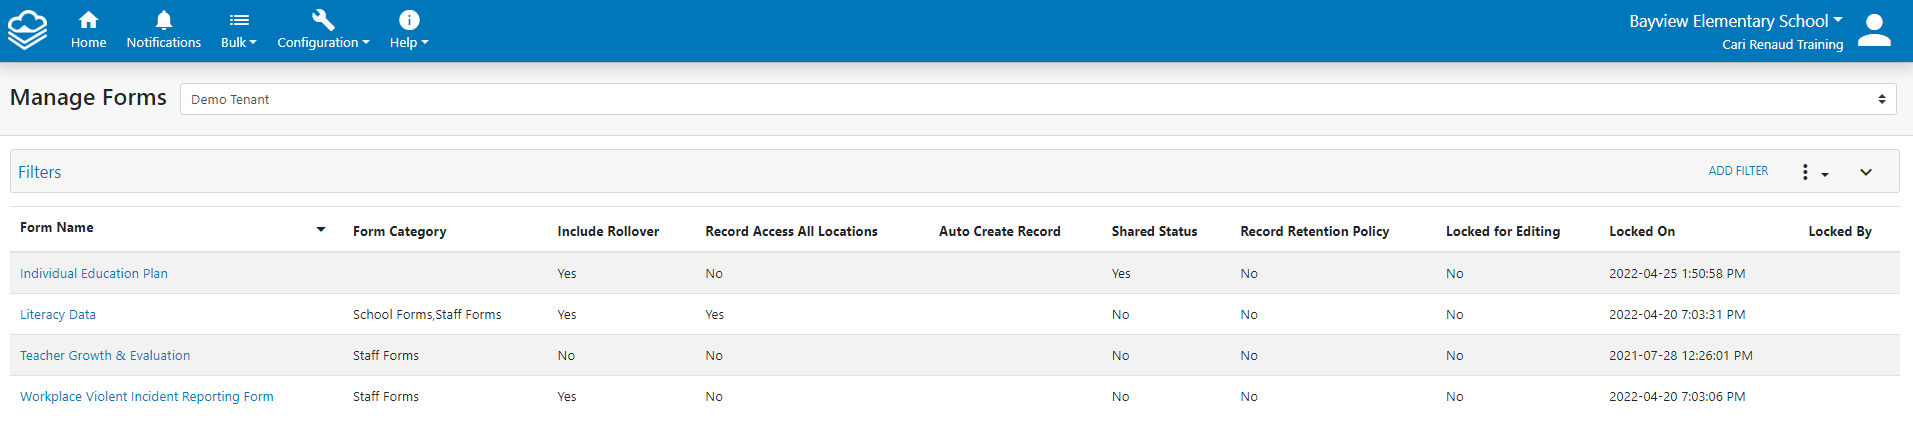
To the right of the form name, the Include Rollover column will have a “Yes” value if the form has been flagged for rollover.

If a form needs to be flagged for Rollover, you can select the form name within the Form Management Module to open the Form Specifics Page. Within Form Details, select the Details card and update the Form Details.


STEP 3: DETERMINING WHICH FIELDS SHOULD NOT CLONE IF A CLONING ROLLOVER IS SELECTED
You will want to identify fields on the form that should be flagged as “do not clone”.
WHAT IS A “DONOTCLONE”?
A DoNotClone is a flag that can be applied to fields or tabs on a form to prevent their values from being copied into a cloned record. This usually includes fields that have signatures, notifications, dates, fields that only apply to this year’s record, etc.
Signatures: You should apply a DoNotClone to all signature fields. This is to prevent a digital signature from existing on a record that the signer has never viewed.
Notifications: You should apply a DoNotClone to all notification fields as this will prevent the appearance that a notification was sent for the newly cloned record.
Finalization Sections / Locking Triggers: Since these fields control whether a record is locked (in which a read only status is applied to the entire record which prevents users from being able to edit the records), adding a DoNotClone to Finalization Sections / Locking Triggers is required to prevent the newly cloned record from being locked.
Functionality: A DoNotClone should be applied to any field that is related to a JavaScript workflow functionality that shouldn’t contain a value when a record is cloned. Examples of this could be checkboxes that trigger disabling functionality, elements that store information related to other fields that are already set to DoNotClone, and hidden fields that are used to store information for workflows.
Fields That Only Apply to a Specific Year: DoNotClones are often used on fields or tabs of a form where it doesn’t make sense to have the information copied because the data within the field only applies to the current school year. If the data in the field is irrelevant for next year, will be cumbersome for users to manually remove, and will be replaced by new data, then a DoNotClone would apply.
WHY CONFIGURING “DONOTCLONES” BEFORE THE ROLLOVER IS IMPORTANT
Record Rollovers use DoNotClones for the reasons noted above. When a record is rolled over, sections that do not have a DoNotClone are copied into the new records. All fields flagged with a donotclone will be blank when the record is copied.
HOW TO IDENTIFY FIELDS THAT HAVE BEEN FLAGGED AS DONOTCLONE
The Record Rollover Report will help you to identify all of your forms that are flagged for Rollover as well as the fields that are configured with DoNotClones.
From the clevr Navigation Menu > Go to the Configuration Menu > Record Rollover Report

clevr will open a separate tab in your browser indicating that it is generating the report.
Once the report has been created, the additional tab will close and the Record Rollover Report will download a CSV file with the results of your report.

Tenant Name: Displays the name of your clevr system
Form Name: Identifies the Form Name within your clevr system. The Form Name will only appear on the report if it has been tagged for Rollover
Create New Record: This field will identify if a new record for the form will be created during the Record Rollover Process.
True: Indicates that a new record will be created for the specified form (this will be true if the form is flagged for a New Record style rollover or a Cloned Record style rollover. .
False: Indicates that a new record will not be created for the form after it has been rolled over. This will appear for Locked style record rollovers where a new record will not be created.
Copy Existing Data: This field identifies if the form is tagged with a Cloned Record style Rollover and if data from last year's record will be copied over to the new record.
True: Indicates that the data will be copied to over to the new record with the exception of fields tagged for DoNotClone
False: Indicates that the data from the old record will not be copied to the new record
DoNotClone Fields: The fields identified here are fields that have been flagged as DoNotClone in the specified form


STEP 4: UPDATING REPORT FIELDS (DONOTCLONES) IN THE CLEVR FORM EDITOR
Field(s) and/or tab(s) that are flagged with a DoNotClone attribute will not carry over the data within them when the form is copied during the Record Rollover process - any fields with a donotclone will be blank when the record is copied. Adding a DoNotClone is ideal for fields that will not apply to next year’s record, saving users from manually needing to delete the information within the field when updating the new record.
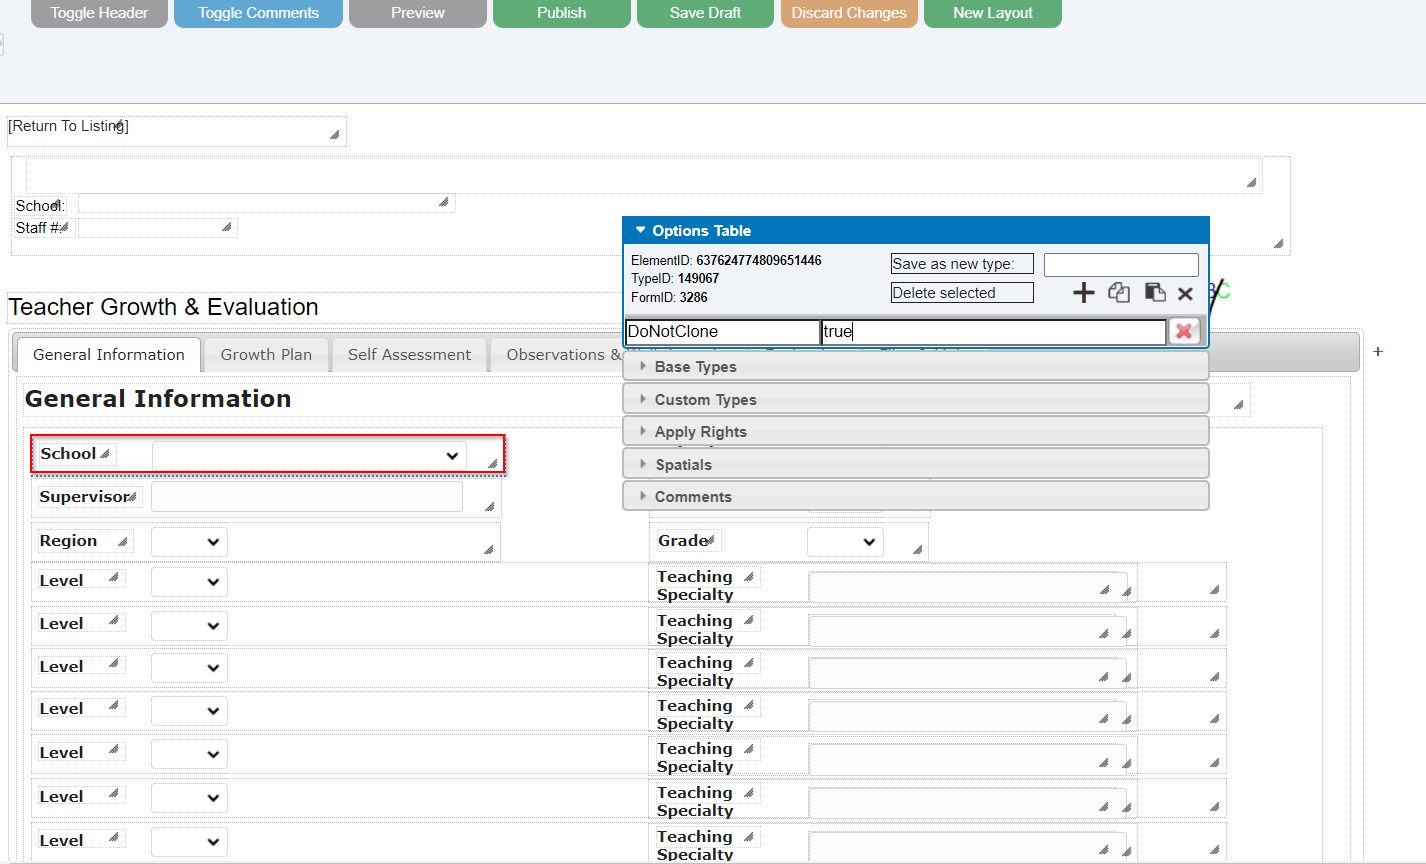
The DoNotClone attribute works on individual elements and on parent containers and can be applied to the form using the clevr Editor.
To edit a specific form, you can select the form name within the Form Management Module to open the clevr Editor. From the clevr Navigation Menu select the Configuration option > Form Management Module and select the name of the form that you wish to update.


In the Form Details page, click on the Design Form button at the top right of the screen.

This will open the clevr Editor allowing you to configure fields that should have a donotclone applied.
When applied to a field, the DoNotClone attribute will cause the field(s) or tab(s) it’s applied to be blank when the form is copied. This is perfect for forms that are record rollover candidates. Use DoNotClones on fields that do not apply to next year’s record to save users from needing to manually delete the information - this can be cumbersome when there is a lot of data within the record.
The DoNotClone attribute works on individual elements and on parent containers. Select the element you’d like to apply the DoNotClone to, then enter the DoNotClone attribute on the right with the right side value of true. Hit enter to save the attribute.
You should also include a description so that the fields with Do Not Clones will have a name appear within the Record Rollover Wizard and Rollover Reports. If you do not assign a description, fields with Do Not Clones applied to them will render within the Rollover Reports via the element ID number.

Important Things to Consider
DoNotClone’s do not propagate to subtabs. You must apply donotclones to each subtab on the form individually on each parent container (97) in the tab set.

When a DoNoClone has been applied to a parent container, all child elements will be blank when the clone is made. There is no way to exclude DoNotClone from a child element if the parent container has a donotclone flag, so if you need a single element to still clone in a container, it will have to be applied more granularly to the children of that container.